11/1/09

Unity 2.6 Free to a Good Home


Well if you were ever on the fence about buying Unity3D... you no longer have to be! Happily announced at the UNITE09 conference this past week, the version formerly known as UnityIndie... is now FREE! Yes, that's right, free. Now known just as Unity, (the "indie") was dropped, it has all the features that UnityIndie had. For no money. The game engine that has "made people millionaires" is opening its doors to the students, hobbiests, and other less fortunate folk who couldn't afford this awesome program before.

Used by EA to develop their new Tiger Woods online golfing game, now able to build to the Wii system, and one of the most popular iPhone development kits... Unity is just a whole barrel-full of awesome. Check it out.


And while we are all very excited about the "freeness" of Unity, don't discount UnityPro either. This newest release, Unity 2.6, has some fantastic upgrades. Including a new Profiler to see exactly where your bottlenecks are, and an Animation editor that lets you graphically see and edit your characters. Or anything you feel like animating, really. But don't take my word for it. They have all of their new features laid out on their website, of course. But really, have I mentioned Free yet?

10/26/09

Jason Freeny

When people think of "anatomy" a few key species come to mind - humans, of course, and then our favorite pets (cats, dogs, horses, snakes, etc.). Some people may start branching out into the less domesticated animals, like deer or sharks or birds. However, Jason Freeny has decided to chart out the anatomy of previously overlooked subsets.

Like gummy bears.


Created in 3D and very well thought out, these prints of the anatomical charts for various objects we see in our lives (lego-men, balloon animals, Domo-kun, and the previously mentioned gummy bears to point to a few) are fantastic. High quality, amusing, and with the added advantage of being very convincing. Jason also has a facebook page where he sometimes posts updates of projects as they are being made, which is always a treat.


not always just posters - his work is available in various formats

Domo-kun


a close up of Domo-kun as he was being made


10/23/09

UNITE Conference


So, I've been fairly remiss in not talking about this wonderful program known as Unity3D. A 'step up' from Papervision3D in that in actually handles 3D meshes rather than a Flash mock-up of 3D, Unity3D is a comparatively inexpensive game engine used by both indie designers and larger companies. The editor runs on both the Mac (OSX) and Windows platforms, thankfully. It also outputs games for multiple platforms - a Windows exe, a Mac program or widget, Wii game, iPhone application (actually a separate Unity3D engine designed specifically for iPhone development), and web-based browser games that run off of a plugin (supported by both Mac and Windows).

I've personally done a small amount of work in Unity3D (and hopefully will get more done... but work has me extremely busy so we'll see). If you know JavaScript, beginning to program within Unity seems to be fairly simple. It also accepts Boo, and C#. The JavaScript is slightly different than the JavaScript used on the web - I liken it to the difference between American English and British English. There are also tutorials by Ethical Games for the change over between Flash and Unity3D. In any case... it's a great program to work, at least in my personal experience.


There is also a conference coming up, in San Fransisco, called the UNITE 09 Conference. Being in San Fran this year, and since I recently moved out to the West Coast, I am super excited about it. I plan on catching at least a couple of days, if not the whole conference. As I said... busy with work, unfortunately. The Agenda looks great - everything from an intro to Unity3D, to Unity for Flash Developers, to a Post Mortem look at some games, shader analysis... I'm very excited, to say the least. More once the conference actually starts!

10/21/09

Gaming and Training


While visualizing CT and MRI scans as 3D colorized volumetric images is not a new thing (see OsiriX, Fovia, VolumeGraphics, Amira, Mimics, 3D Slicer and many others that I personally don't know about), it is becoming quite popular for training and surgical planning. However, BodyViz actually uses an X-Box controller to bring the 3D patient scan to the surgeon. Personally, I find the use of a video game controller to be highly intriguing. As my generation grows and becomes the doctors and surgeons of the future, I know that I would prefer them to look at my body first before preforming surgery. And coming from a gaming background, using a game controller to move through a data set makes a certain amount of sense. Whether it be on this technology or something similar, I find the possibilities growing, and very exciting.

Video Game Technology Helps Train Surgeons

From BodyViz:


BodyViz has extensive visualization features that enable users to quickly and effectively view and interact with their patient's data in a never-before-seen 3D manner that is changing the way medical professionals view their world. The user interface is operated by an Xbox 360 controller which allows anyone from surgeons to medical/anatomy students to simply “travel” under the skin, past the bones, through the arteries, blood vessels and organs and literally fly through patients’ bodies. The game controller lets physicians create "clipping” planes and insert virtual surgical tools that can be maneuvered around internal structures of the anatomy in all directions. Users can also choose what tissue densities to view and from a variety of colors to enhance the data. BodyViz is affordably priced, lightweight and simple to use on laptops or PCs.

10/15/09

3D on the Brain

So, some of us have 3D on the brain. However, some of us construct interactive 3D models of the brain. Well... at least the cranial nerves. Created by a talented 3D artist, Kieran Meek, and vetted by doctors to ensure accuracy, the eHuman Cranial Nerves iPhone app rocks. (And I'm not just saying that because I work there...) In any case, I believe that this app can speak for itself.


"Learning the 12 cranial nerves and the foramen in the base of the skull are an essential component of every anatomy course; all health professionals, anatomists, biology students and anthropologists have had to memorize their names and functions. Our app allows students to enjoy learning the nerves and foramen in a highly visual, interactive environment. The models are reconstructed from a high resolution CT scan, and the user can control the position and transparency of the skull and each nerve. Accompanying textual information is just a tap away."


Solid view


Semi-Transparent view


As stated in the image... Selection Mode


And an example of the information pages


If you have $5 to spare (and an iPhone or iPod Touch) you should pick it up just based on pure 3D awesomeness. Even if you don't have the $5, bring lunch from home one day and buy the app instead :).


(although this post may just be proof I shouldn't update at 1am. I know the bad pun at the top is...)

10/7/09

Museum Update

Well, I am still beyond tickled to see work I've done in OsiriX being used by the Fine Arts Museums of San Francisco. Short explanation of how the images were made to follow.

So, because I feel like sharing, here are two of the flyers in which my images are used. (the flyers are the work of the design team at the Museum, I just provided content).

The Press Release flyer.


A promotional flyer, first page.


First of all, I must admit that I have upgraded the computer that these images were made on to 64 bit version of OsiriX. It is an 8 core Mac Pro, with at least 4 gigs of memory, perhaps more. I drool over it, but it's not mine. In any case, it handles large case files well- and this was a very large file. Multiple scan inputs, with the largest being over 4,000 slices. Needless to say, the 32-bit OsiriX, while open-source and awesome, could not handle this dataset.

So, by upgrading to the 64-bit version, we were able to utilize the full power of the machine. And let me tell you, for 3D visualization purposes, I highly recommend the upgrade. It's amazing and well worth the money. And doesn't it just give you a warm fuzzy feeling to know you are supporting a favorite program? Maybe that's just me... If the warm fuzzies don't do it for you, knowing that a 3000+ data set can be opened without hiccups and in less than 2 minutes may peak your interest. I am thoroughly enjoying the upgrade, when I get to use it.

Now that the program handles the dataset (barely), it takes hours of fine tuning to get any sort of recognizable image. I much prefer working with live humans, as the cadavers (especially mummies!) just don't have the same clarity. None of the pre-set CLUTs that come with OsiriX truly worked with this mummy data, but I had a very interesting time coming up with my own 16-bit CLUTs to use and save. The results were quite interesting, and for the most part, the museum didn't ask for any major changes. I did tweak the overall color in Photoshop (from a red to a golden-orange), but no cover-ups or major Photoshop changes.

I do love OsiriX and any opportunity to use it is great fun, not just work.

That is pretty much it. Now, I have to find someone I can vivisect to see the brachioplexus in action. Any volunteers?

10/2/09

Meet the new "Working Me"


Soooo... with the advent of my internship and then subsequent job at eHuman, I have been beyond busy. I don't think they've invented a word that actually covers how much work I'm doing. Which I am not allowed to post. There's this whole 'non-disclosure' agreement companies make you sign...

In any case, I can post things that have been released into the wild, so to speak. So, here are some images I generated in OsiriX for a mummy that was recently scanned at Stanford. Some are !gasp! actually being used in print. (which I am actually incredibly giddy about...)

The Fine Arts Museums of San Francisco are putting on the Very Postmortem: Mummies and Medicine exhibit.
"Archaeology meets technology in this small-scale exhibition exploring the scientific examination of mummies and providing new insights into the conditions under which the Egyptians lived. Included is the sarcophagus and mummy of Irethorrou, a priest from Egypt around 500 B.C. His mummy has undergone a CT-scan that allows a unique viewing experience of a three-dimensional “fly through” of the body and a forensic reconstruction of his head."
Here are some images from their flicker archive of the transport of the mummy.

Being scanned by a 'c-arm' scanner at the Stanford Hospital.


Checking out the incoming images.


Meeting Irethorrou close up. He was a priest in Egypt from about 500 B.C.


And now, to meet him internally as well.... Here is a sampling of the OsiriX images that I generated.

A full body request - although the arms were not attached to this version of the scan. Because of the size, the mummy was scanned in multiple parts and then stitched together by the wonderful Robert at the eHuman office.


This image (without the logo and turned completely vertical) was used in the promotional flyer for the exhibit.


This was another one specifically requested to show this amulet. It has been decided that it is the "Eye of Ra" and they wanted to showcase it. Unfortunately, OsiriX may not be the best program for that. No matter how much I tweaked, that was the highest level of detail that came through on the amulet in OrisiX. So I doubt they will be using this one.


I am very excited to see the exhibit all put together, and can't wait for the 31st! (Opening it on Halloween is cute, I swear).

I will also attempt to post more often. Hopefully some other projects will become 'public friendly' and I'll be posting about other projects that eHuman is producing. It's an exciting time to be here, and I am absolutely loving my new job. And the fact that I have a job. Now this whole 'must graduate' thing is another story...

5/7/09

Atlantis

Well, it's been quite a while. I'll start catching up on what I've been doing this past month over the next couple of weeks or so. One of the things I've been working on is an update to the submersible scene that I've posted here before. I've updated some texturing, played with a few new camera angles, and put in some more dramatic lighting. Obviously, I'm not finished with it yet. Any comments or suggestions that you have, I would love to hear.

Just to re-iterate. The sub was originally built in 3Ds Max 2008 as part of a challenge I was unable to complete. I took it into Maya this semester to spiffy it up and add it into an animation. The scenes are rendered with Maya software when I could get away with it, Mental Ray for the first two scenes. Personally, I think it shows and I can't wait to actually have the time to let my computer render it out.


This was all keyed by hand rather than using any sort of dynamics system. I may change that in order to get a little bit more natural movement in the beginning. Animating the chain holding the sub up is proving to be a pain. I hope I can rig a hair system that will flow a bit better. I've done it before, but it's been a few years. I also need to add more animation and character to the last scene where we are following the sub. Not to mention that is an awfully barren sea floor, and those ruins are kinda pathetic. I have plans to continue to build that environment up so it is much richer.

I'll continue posting more on the animation front after I move across the country. Egads.

4/11/09

Atherosclerosis - Blood Vessel

Here is one of the latest things I have been working on - Atherosclerosis. This takes place in one of the coronary vessels of the heart. I would consider this a "second stage" animatic, as the first stage was something I was ashamed to post even here.


In any case, this was done in Maya. I used a basic particle system for the blood, with a rotating erythrocyte instanced onto the particles - with a uniform field, a turbulence field, and a radial field also affecting the particles. They still have some self collision issues that need to be worked out, obviously. I attempted to use the work around of having each particle generate a radial field, but while that partially works... it also causes the blood to be very jumpy in parts.

I also feel that the turbulence field may be turned up too high, and the rotation of each individual erythrocyte needs to be slowed down a bit. I had to use a trap function of the turbulence to stop the particles from intersecting with the blood vessel wall, despite the "make collide" feature being activated. The GeoConnectors may have some issues associated with them right now that require further research.

The vessel distorts with the use of a blend shape. Obviously, this is not the final texture. However, it did show me that the texture may stretch when I apply it to the vessel wall. I'm wondering if a texture morph may work better, if Maya even does that. I know 3DsMax does, but I haven't tried it in Maya yet.

The background was just a quick fill so it wasn't just floating in space. It was added in AfterEffects without a lot of tweaking, so it doesn't quite match the camera. When the final animation is finished, the actual heart will be composited into the background with the correct camera moves. White blood cells and platelets will also be added, hopefully with a 'liquidy' effect as well. I plan on doing some research to ensure the scale is correct between the vessel wall and the blood elements, as it is a coronary vessel and a bit smaller than say.. the aorta.

I would appreciate any thoughts or comments as I work this video out.

3/19/09

Volcano

As promised, a volcano. Also done for a class tutorial project in Maya. I slapped a water-like plane and a sky sphere into the scene to give it a slightly more natural look. I also did not include sparks coming out of the volcano. Sparks are rendered with Maya Hardware, seeing as they are streaks, not sprites or clouds.

So, there is a sprite volume emitter spewing smoke (way too fast, by the way, but I didn't feel like tweaking the uniform field on it any longer). The volcano was made live, a curve drawn on the surface, and then it was made into a flow emitter with blobbies. Finally, there is a second volume emitter with cloud particles for the steam.

I found that working with particle systems is a heck of a lot of tweaking and fiddling, but it can be fun. Especially if you have a book nearby that you can read while it is rendering.


So, a volcano, in the middle of the ocean with nothing else around, on a bright sunny day.... 3D, maybe? Naw...

3/17/09

"Ring of Fire"

So... wow, school sure is busy. In any case, here is a quick tutorial that I worked on for one of my classes. It's a semi-homage to my program, Biomedical Visualization - or BVIS for short, in case you can't tell. I didn't want to just have an animating circle, which is what the tutorial called for. And when I say short, I mean it took me about 20 minutes, and that was only because I had to retrace part of my steps for the texturing.

This was just a quick "emit from curve" with a scale animation on it. The fire texture was yanked from a procedural texture from Maya. I did have some issues with density, but I just ended up copying the sequence in After Effects rather than try to render it out to tweak it.


There was a volcano tutorial that was a pair with this one, but I am having severe issues with the curve actually adhering to a live surface. It's driving me nuts, really. So, no volcano.

Now, I'm off to do something (hopefully) productive and related to the multitude of projects that are looming.

3/10/09

Creeping Hand

Well, for my Maya class, I have a creeping (or is that creepy?) hand. It is moving veeery slowly across the floor, so that will have to change. I have been given the suggestions of "more wrist movement, put the thumb down for weight balance, have the wrist drag, do more of a quadruped movement with pairs of legs" etc. The low position of the carpal bones also lends itself to that creeping motion, like it is trying to hide. Having them in a more 'up' position may give a more aggressive or alert feel.

I was going for a very spider-like movement with this test. I've changed the rig multiple times since I first posted the summary of it. I also just completely deleted the rig that went with this movement and started over again. I did not have a bone in the right place to allow for a mid-carpal movement to happen. And I'm thinking of some sort of 'reverse wrist' like rig to have the wrist inherit movements from the fingers as well. I haven't decided that yet... I'm also thinking of having it drag something. A watch and a purse were two suggestions, but that really doesn't fit with the animation that I am going for. So, maybe a tag, like an archeological identification tag or something similar. Hmm...

Hand Movement Test


3/9/09

Virus Animatic

My fellow classmates and I (there are six of us in this particular ensemble) are undergoing what teachers like to call a 'group project' and students usually affectionately refer to as 'collective procrastination' (among other less savory terms). In any case, this project involves working up an animation for a mock client. We came up with a topic, a client, a budget, and a script to start out with. The fact that the script was finished without coming to blows was amazing to watch.

Now, this paints a not-so-nice picture of our group, which isn't true at all. We all genuinely like each other and enjoy our fellow classmates' opinions. It also appears that we have very wide stubborn steaks. It was an amusing, very polite and amicable, absolute refusal to back down or admit defeat. However, after hours of research and discussion, a script was born (and revised and studied and rewritten and mostly finalized). Naturally the storyboards stemmed from there.

Another thing that has tripped us up to some extent is the unrealistic-ness of the situation that our group finds itself. Six freelancers would not band together to work for four months on a 2 and a half minute animation for an educational institution. You would be lucky to get two animators together, and we won't be touching the actual time frame. So, to start with, there is quite the interesting set-up.

However, as mentioned before, we are stubborn and we persevere. Thus, here is our animatic from said project. It's like a baby animation that was born slightly deformed and is missing some fingers. And maybe an ear.


3/6/09

Red Stick Animation Festival


Well, I never thought I would open up an email from highend3D to see my old home town gracing the pages of their newsletter. However, that day has come! It's kinda cool.

In any case, the Red Stick International Animation Festival has been going on in Baton Rouge since I was a.... something or other in undergrad. Anyway, it was first started in 2005 as a little smallish thing that I thought looked kinda neat. It was hosted on campus then, but it was quite fun.

"The [Festival] is an exciting community event that converges the worlds of technology, art, entertainment, and exploration."


Now, the Festival has gone on to bigger and better things, make no mistake. Events are being held at the Shaw Center for the Arts, the Manship Theatre, LSU Museum of Art, the Old State Capitol, and The Art and Science Museum Planetarium. Much grander than the Union theatre that I remember. The Shaw Center is a beautiful building in downtown Baton Rouge.

The international aspect is very cool, and winners of the Festival come from all countries. And larger companies also scout out the competition. Such as the American Animation Market, and a "Pitch! Contest" that allows animators to showcase their work from start to finish to show to industry professionals.

It's a great event, and I'm proud of my hometown for sponsering it. Which is a strange feeling, let me tell you...

3/4/09

Hand Rig


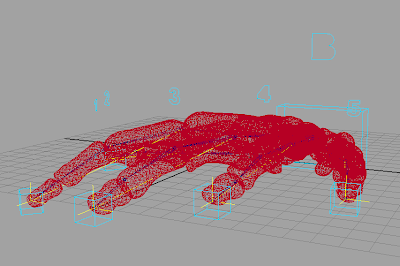
Well, this is my detailed hand rig v 1.5 (I felt it deserved a higher than just 1 seeing as I've reworked it about s
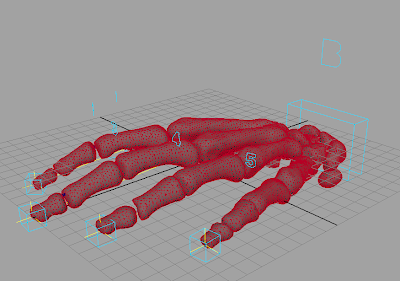
even times just this night). Eventually the bones will have a spider-like motion. The geometry is bound with a rigid system, as they are bones and need to move independent of one another. I have not yet gotten a chance to retopologize these bones yet, so they are a tad heavy on the polygon count considering their size.


The smallest bone (the distal phalange of the 5th digit) has 340 faces. 
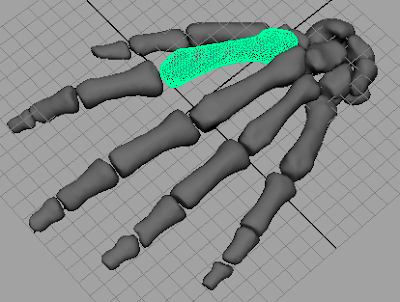
The densest bone (the metacarpal of the 2nd digit) has 2,636 faces. There are a total of about 30,000 polygons in this model. Needless to say... this is a tad extreme for this model and this could easily be cut in half if not much more than that. I will be considering this as I refine the model.


The reason that they are so polygon heavy is due to the face they are actually exported from a DICOM imaging program. I will be touching on the process I use to go from DICOM data to model at a later date. At this point all that needs to be known is that it gives highly accurate, overly dense model exports. I mentioned the Zbrush retopology feature in an earlier post.


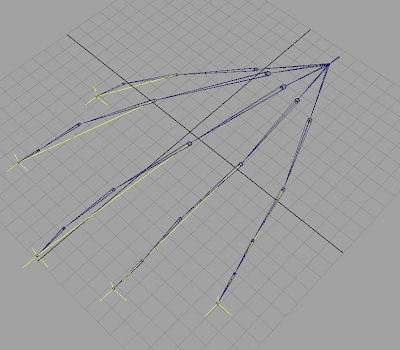
So, as can be seen, the rig itself doesn't have that many bones or IK chains. However, as I was posing it for this post, I noticed some areas (namely the metacarpal joints) that need greater control during IK posing. So, I'll be adding a few more IK solvers soon. The bones just aren't bending quite right with the current set up. It's possible to edit them as I animate, but another set of IK chains will just speed the process up.


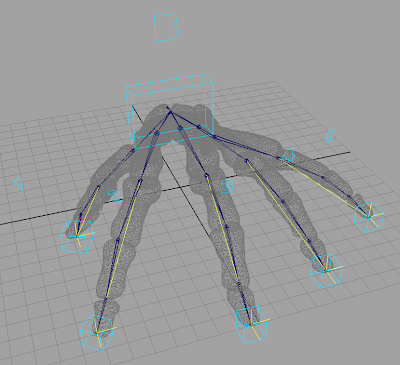
In any case, the actual boning is fairly standard, with a joint at each... well... joint. I did not include the midcarpal joint though, seeing as the wrist ends at the carpal bones and no bending is occuring there. But that would have been a non-standard joint in any case. So, there is a root, a wrist joint, and then joints at the carpometacarpal joint, metacarpophalangeal joint, and interphalangeal joints. While the joint between the carpal bones and metacarpal bones doesn't actually experience a great deal of movement, some artificial movement may need to be built in for a more natural walk cycle.


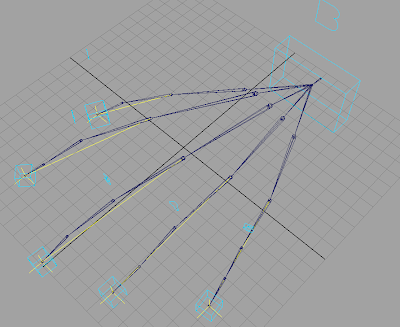
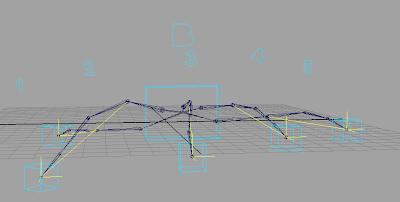
The real complexity begins in the control curves. I of course have the basic control at the end of each digit that constrains the IK handle for that finger. There is also a pole vector on each finger as well, as seen by the number 1-5 (referring to the digit number). There is the body control curve (the B) and an overall wrist control box.


I thought about having curves at each joint to control the orient during FK mode. However, I decided upon set driven keys instead, controlled at the wrist control box. Each joint that would bend during making a fist has its own individual attribute in that curve. In addition, a master IK-FK Blend switch is also there. I tried to make a fist control that I could turn on and off, but I have yet to accomplish that... I think there is a way, but it will involve more linking that I had done so far. I had hoped there was a simpler method.

In any case, the constraints within the curve system were interesting to set up. I wanted the Bend curves (the pole vector controls) to move with the IK handles most of the time, be able to move independently if I needed them to while still staying linked to the IK controls. Also, I needed them to be able to switch to following the Body control curve. So I made an attribute that controled the weight of the constraint as needed.

The body curve moves the wrist joint, not the root. The wrist control box both moves and rotates the entire hand. And of course, it controls the IK-FK blend mode for all five fingers. There is a set driven key on each IK control curve, and then the master set driven key is on the wrist control box.

Now, as I begin to see how this rig animates, I will start planning the walk cycle and other character movements. The hand is going to move across the room and crawl up a table leg, so I will need some pretty fine control over every joint. Hopefully I can add in some standard movements that can be easily triggered. Wish me luck. And if anyone has any hints as how to make this rigging better, I would love to hear them.


3/3/09

Papervision3D


Well, I've spent the last two days having an intense training seminar in Papervision3D (taught by a coding genius, John Lindquist), eight hours a day. It was a great experience, and I think I learned more than I actually know, if that makes any sense. My personal level of action script is not up to snuff, so to speak. I have this great ocean in front of me that is action script... and I'm having a hard time getting to the island that is papervision. Or maybe I just want to go to the beach. Warmth would be nice this time of year.

In any case, I found that the files that he provided were worth the price of admission alone. Well... nearly. Although I was told to use Adobe Director (i.e. Shockwave) when I spoke to the instructor about my heart project, I'm not sure that what I want can't be done in Papervision3D.
(EDIT: later, a few things were discussed and other options within Pv3D were mentioned.)
However, is it necessary? How hard should I push for the Flash component? That is unknown. Unity3D is another highly possible choice for my development. In any case, this class was great in general. I can't wait to get some time to actually output some content.

Object (or trackball) rotation is highly doable, and I think that some masking to show inner anatomy while rotating is also a possibility. I can think of many things that would benefit from being shown from all sides with an interactive component. All of these things are very positive marks in the "why use pv3D" column. There are a few things to be considered, although the flash vs. unity3D could be debated until the end of time.

Flash in general renders everything through code. This cuts down on the graphics card interface, which can be a good thing for a lower end user. However... this cuts down on the graphics card interaction, making high polygon models very difficult to render out. Unity3D talks directly to OpenGL and Direct3D (or something similar), allowing you to use much higher polygonal models. The down side to this is that if you don't have a graphics card that supports it, you can't see the app. There are many more pros and cons, but in general Flash was not originally designed for 3D. That being said, it is a great way to introduce interactivity with a high level of penetration into the market. And the whole "not originally" blah blah is not nearly as relevant as it used to be.

Man, I think that I still need a couple of days (weeks) to truly process the wonders that are Papervision3D. So I leave you with an awesome little link by one of the masters, Den Ivanov.


3/1/09

Retopology

Retopology... retopologization... however you slice it, it's a difficult word to say. But immensely useful to actually do. For example, most items that have been scanned by a device have an ugly, ugly mesh. Usually very dense, and all triangles.

This is a mesh from a femur that was edited in Mimics. It is from a CT data set, taken from the skeleton that I'm currently modeling. Mimics is a program similar to OsiriX - it can take DICOM data (CT, MRI, etc) and export a file that can be read by a 3D program. This is wonderful for achieving highly accurate models, but not so good for clean meshes.


The .obj file is being viewed in a program called MeshLab. It has the ability to handle high-polygon meshes very well.


The femur that I am working with exported with around 139,000 faces. This actually isn't that bad, comparatively speaking. I've easily come across a 4 million poly export from a DICOM program. Even so, this mesh would be a pain to texture and animate with.

This is Zbrush. My main love for Zbrush (and it's a recent discovery) is the retopology tool.


By drawing new polygons on the surface of your high res model, you can export a low res stand-in. The model that I generated has 3,200 polygons. A far cry from 139,000.


I could have made it with fewer polygons, but I found that the mesh reacted best to a slightly denser layout. Perhaps because I'm new to this whole retopology endeavor and haven't learned all the tricks yet. I do have an entire skeleton to work on, so hopefully I'll continue to learn.

The wire frame is now as clean as you make it, allowing for potentially great edgeflow. This makes texturing and animating much, much simpler.


However, this is not what I find the most useful attribute of retopologization. Zbrush allows you to project your original high res mesh back onto the low res model. By matching how many times you up the density during retopologization, subdiving the low res obj that many times again, and then importing the high res mesh on top of this highest division, it becomes a smooth stepping process between the lowest and highest resolutions.


Did that sound complicated? It was very fun for me to figure out, let me tell you. If it didn't... well, you are smarter than I am. Kudos.


In any case, there are tutorials out there on the retopology tool. If you are interested in my entire workflow from Mimics/OsiriX to Zbrush, let me know.


These images that you see are screen shots of the femur as exported from Mimics. I have not done any further editing to it yet. I plan to do so, of course. I will post more images as my bones are completed.