7/21/12

Research: project scheduling

I don't like to schedule things.  As in, I don't feel that I estimate dates well.  Telling someone that I will finish that in 1 hour or 1 week feels... strange to me.  And yet, very necessary in my day-to-day world.  I am much better at estimating dates than I used to be, now that I have seen how long project take in the 'real world' with my work environment taken into account. 

However, I often just give a general guideline - I will be done with the entire thing in 2 weeks.  Breaking a project down into it's component parts is a level of difficulty that I dislike even further.  What do you mean I need to know how much time it takes to segment vs. retopo vs. texture vs. animate vs....  Give me two weeks and I'll give you the finished product.

But!  That's not life.

And breaking my research project into manageable chunks will work out.  I do like the feeling that something has been finished.  Even if it's something like finishing the first coat of paint or one bone segmented from a skull.  Little blue check marks next to an item that I needed to complete gives me a warm and fuzzy feeling.

So, despite the fact that I wanted to write this:

Even this has more detail than usual...

 I gritted my teeth, put on my thinking cap, and wrote this:

What?  That looks... almost official.  Like a project schedule, even.

So, I have made my project schedule drawn up and submitted it to my committee and even blogged about it.  I think it is high time to paint.

7/20/12

Self portrait sketch

In addition to other things, I am working on a challenge from CG Hub - 'skinless portraits.'  Very fun.  So, here is my quick color study of myself.  And I do mean quick, as in a sketch. 

Webcam shot - I'm tired.

So, this will be the basis of a 'skinned' portrait.  Fun!  I love CG Hub - they have great ideas.

Amira: lasso tool

Okay, so we 'left off' with just a base segmentation started, using the threshold tool.


Regardless of the nature of the end product (at least most of the time), the bone marrow area will need to be filled in.  I typically like to do this before I do anything like segmenting out separate structures.

This can be done using a combination of the other tools available.  I find the lasso tool to be a great place to start.

Lasso tool:

It actually works a lot like Photoshop.
Like the other tools, the lasso tool has options that affect how it works.  I often use it in the default mode (as seen here), but some of the bells and whistles can be interesting.


The 2D Freehand shape, the one I use the most, allows you to draw any shape on the individual CT slice and the lasso tool will select whatever is inside of that ring.  Fairly self explanatory.  If you select the "Auto trace" check box, the tool starts to act more like the magnetic lass tool in Photoshop.

The trace function can snap to the edges of a selection when selected.  This is also where the 'trace edges' check box comes into play.  When checked, it snaps the freehand lasso to the nearest edge, for the most part.  If unchecked, it tends to lasso around the nearest area of contrast.

 
This can be a useful tool for filling in the interior of the bones.  However, I feel like I can get a similar effect while using less time in just 'freehand' mode.  Because there is often a thicker area of bone around the interior, it can be easy to do a quick circle around that.  Of course, I am using a wacom tablet instead of a mouse, so the motion feels very natural to me.


The next option over is the 'ellipse' setting.  This draws a plain circle, or ellipse (the oval shape and size are controlled by you).  I remember using this when I first started out, but I very rarely use it now.  I prefer the control of the freehand.  I suppose it can be a useful tool to interpolate between for selecting a swath of voxels.

And the final option in the 2D portion - the rectangle setting.  Yeah, I never used this. Because I work with very organic shapes, I just have never used it.  Like the ellipse tool, I suppose it would be useful for eliminating voxels along the edge of scans that get selected by accident?  I still use the free hand lasso for that though.  But, it's an option.


A pretty cool part of the lasso tool, and one that I often (regrettably) forget about, is the 3D lasso mode.  It has two options - inside and outside.  With the lasso tool selected, enter into 3D preview mode.  The view in "3D" checkbox needs to be selected next to the material, and a point cloud will be generated based on that material.  With the lasso tool activated, you can draw in 3D space and Amira will interpolate that selection in the Z plane.
You can see here that if you aren't lined up correctly, you may end up killing some of you model inadvertently.  So you'll need to keep an eye out for that.  But, it's a very fast and easy way to deselect those pesky voxels at the edge of a scan.  Anything you select in this mode can be added or subtracted from a material.


Great, so that's how the lasso tool works.  Now, what do I use it for?

Personally, I use it to fill in the gaps, like I said when I first started this post (hours ago, so I had to check again...)  If you fill in one slice, and then choose one many slices down the road, you can fill in large gaps.  It's similar to putting a lid on both sides of a tube.  The tube is now water tight and the selection will stay within those lids.

Hold 'shift' to select multiple areas
Here I've used the Pick & Move tool to selected all of the areas between two slices that I filled in.  With the 'all slices' box checked, Amira will automatically fill in just that area, if it is water tight.  If there is any leak to the outside volume, the selection will leak as well.  These worked pretty well.

Something to keep in mind can be how thick the outer bone is - in things like long bones where that thickness is larger, this process can save huge amounts of time.  In skulls?  Not quite as useful.


In any case, that is the lasso tool in a nutshell.


7/19/12

Paper Mache Clay: Eye 2

I let the eye dry for a couple of days, and I've put the first coat of paint on it.  It's supposed to be a 'dark' piece- so I'm thinking of a sculpture look-alike rather than realistic painting.  I hope that I can pull it off.  And quickly!

Ready to get my painting groove on!

First layer - Burnt Umber, Raw Sienna, and Indian Red.  Mostly burnt umber, as you can see.  This is just to give my dark under tones.


But! Would I really be an eye without eye lashes? No!  So, three gauges of wire stuck in and superglued to make the eye lashes.


A thicker wire with the other two gauges for the upper lashes.  Thinning out as it goes towards the corner of the eye.


And just the two thinner wires for the lower lashes.  Again, thinning as it goes towards the corner.


Painted the wire to match the base color. 

I thought about adding glasses as well, but I made the eye too big to do that.  Whoops.  And I made this one directly on the illustration board, so no take backs!


I've started to add in the green under tone as well.  After this dries completely, I'll be able to start doing washes with other colors to give it a richer look.

Amira: threshold tool

I was asked an interesting question today - how do I like Amira as a segmentation program?  Short answer - I do like it.  I used Mimics in Grad school, but I've used Amira exclusively since then.  So, I decided to do a post on the tools I use in Amira 5.3.3 to segment. This is not meant to be a 'how to use everything in Amira' post - just a quick look at what tools I use to do what when I segment. (Just for the record, the user manual is over 500 pages long.  No joke.)  This post may end up being a series of posts...

But before I just jump into the tools, let's touch on Amira in general first.  Amira has two sections that I use the most often.  It opens up into the Object Pool, where you can load your data set and label file.

Mode menu in the upper left of Amira

These are kept separately by Amira, but a data set cannot be viewed in the Segmentation Editor unless it has a label file associated with it.


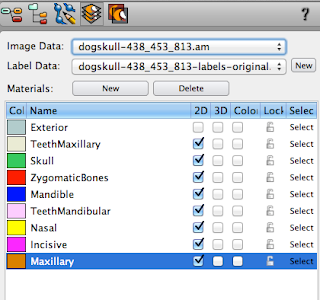
Switching to the Segmentation Tool view mode, you can see where your scan is loaded in the Image Data area.  You can have multiple label files associated with one scan, and those will be located in the Label Data area.  You can switch between your label files at any time using the drop down list.  If you can't see the scan itself, it's likely you don't have a label file associated with it yet.  Just click the 'new' button to the right of the Label Data area to create one.

Within each label file are 'materials' used to actually segment the scan.


I think of like a series of tracings - you have your original drawing that you are breaking up into layers using tracing paper.  All of the tracings together make up the 'label' with each sheet being an individual material.  The main thing to keep in mind is that every pixel of the scan can only be claimed by one material at a time.  Materials do not overlap.

Your initial label file comes with two materials - the Exterior and the Inside.  Exterior isn't actually a material per say - rather, it's where all of the pixels that aren't in a specific material are kept.

If you were to view the exterior in 3D, it would just be a block.


Here you can see that the 'exterior' material has all of the pixels not currently assigned to the 'inside' material.  It shows as just a block.  It's the only material that I allow to stay as a default assignment.
I did a very fast thresh-holding to show how pixels assigned to an different material will show in 3D space.  Material names and colors can be changed in the material list by double clicking on them.  They can be turned on and off in both the 3D and 2D view ports.  The outline in the 2D view port corresponds to the color of the 3D object and is defined by the color block next to the material's name.


Tool Icons
These are the tools available for basic segmenting.  From left to right: Pick & Move, Brush, Lasso, Magic Wand, Threshold, Blow Tool.  My most used tool?  The brush, hands down.  But I have used all of them, so we'll take a look at examples of when I would use which tool.  I will be going in order used during segmentation though, not actual tool order.

Threshold: Unless I am starting on a data set that has already had some segmentation done, this is my first tool of choice.

The threshold tool allows you to select all the pixels within a certain grey-scale range.  As you can imagine, this is a fast and dirty way of grabbing as much of a certain object at once.  This works best on high contrast material, such as bone.  (It works even better if all you have in a scan is bone, as is the case with this canine skull I am working with right now.  Otherwise the editing grows exponentially.)

Most tools have more options available to change.  Those are located below the tool menu itself.  So the threshold tools allows for both single slice and all slice selection (if you uncheck 'all slices' it will only look at the current slice) and you can threshold within a certain material only.  After setting the threshold, one must select that setting to be able to add it to a material.


You can set what range of pixels will be selected by the threshold tool directly above the tool menu.  Without getting too complicated (Hounsfield units, etc) - there is a small histogram that shows the range of values within the scan: white being on the thousands on the right and representing bone or metal, black going down to -1000 on the left and representing air (0 is water).  Humans can't actually see that large of a variation in grey levels, hence the window width and window level values.

However, to simplify - threshold can select a range of these values.  You can dynamically see what is selected in blue as you adjust the slider.


Once you are satisfied with the selection, you must actually 'select' it to be able to add it to the material.  Once selected, it turns red (and mixes with the blue of the threshold tool to turn a purplish color) and the selection tools turn red on the left.  "Add selected voxels" or the "+" button will begin the segmentation process.


Now, why would you threshold on a single slice only?  Or even within a material?

Both options are useful when trying to separate a single material into more complex selections.  Say you are trying to remove teeth from the whole skull material.  Or bone from a more universal body scan.  Again, this only really works in a whole scale way on areas of higher contrast, such as bone and teeth.

You can see that the black areas are not selected - the insides of the bone will need to be filled in using different tools.  But this gives us a great selection to start from.

And I will look at the other tools another day.  


7/18/12

Paper Mache Clay: Eye

I discovered this awesome site - The Ultimate Paper Mache Blog - a few weeks ago.  However, I never had the chance to actually make the paper mache clay that she has listed on her site.  I finally did tonight.  And I love it.

One of my ideas for the eye square completely flopped.

Yep, that's supposed to be an eye.  It didn't work out so well.
This happens.  I'm not happy that it happened, but hey - move on.  So I did.  And with the due date not just fast approaching, but rapid galloping towards the cliff... I need to get cracking quickly.  So, I pulled the nails from the board, and started my third (or rather, technically a variation of my first) idea.  I'm excited about it, and I plan on working hard core on it so it's finished and dry by the time I need to leave for Toronto.


So, I used the recipe that she outlines on her blog.
  • 1 and 1/4 cups of damp (complete soaked and then wrung out) toilet paper.  This was most of the roll for me - you can see those three lumps left over.  And you measure the toilet paper by smushing it pretty well down into the measuring cup.
  • 3/4 cups of white (I used Elmer's) glue
  • 1 cup of joint compound 
  • 1/2 cup of white flour
  • 2 tablespoons of linseed oil - and yeah, I completely eyeballed this as well

I broke the wet pieces of toilet paper up as she described, so that the mixer could deal with them.  And then I combined all the ingredients and mixed.  I'm pretty sure that I had too much toilet paper in mine - the mix is supposed to be like cookie dough, or frosting... lets just say that mine isn't.  But it works.


The resulting mixture.  It goes on very well with just my fingers.  I should think about use a different delivery method, but I love to work with my hands.


But!  You still need an armature to work with.  If I were to use this like actual clay, not only would it be pretty heavy, it would never ever dry.  So, I used some of the left over tissue paper and tape to make an eye armature over the illustration board.

I wanted a sideways looking eye, for reasons that will become clear as this goes on.  This is the first layer going on.


I'm not thrilled with out the eye lids are looking.  or rather, not looking.  So I decide to add another layer of tissue paper and tape.  This is pretty much what I do until I get the desired look.  Exaggerated details work well when applying the paper mache clay.


 Better eye lids going on.


After that, I still felt like the top lid wasn't pronounced enough.


 The finished armature.


It has a vague eye-like shape.


 So, I started to cover the armature!  This is pretty much where I immediately fell in love with this stuff.  Seriously in love.


It goes on pretty well, not many lumps at all.  And it has a nice texture to it.  Slightly papery, as you might expect.


And here is the first layer of the paper mache clay eye!  I'm drying it now, and I may need to build up a few details here and there.  A tip that is kinda gross... this stuff smooths better with spit than it does with plain water.   However, I don't recommend it.  I'm thinking that using an oil (like linseed oil) would be a good substitute for a smoother as I am working.

I can't wait to start painting it!

Random sketches: hippos

So, I've been pretty swamped at work, and I haven't had a lot of time to get much of anything done.  However, I did sketch some hippos. Including a hippo from a challenge about flying animals that ended up flopping.  So, it's not going anywhere any time soon, but it was fun to sketch.  Enjoy.

Hippo poses - roughly 3-5 minutes spent on each

Start of an idea.  I like hippo feet.

7/15/12

Segmenting the Canine skull, part 2

I feel like I got a goodly amount of work done on the skull today.  Even if I'm still floundering a bit on where suture lines are. 

Canine skull, end of day 2

I have around 32 different photo references I've pulled from the net, including one where the different bones of the skull have been painted and labeled. 

A very useful powerpoint from the Calgary Association of Veterinary Students.  This is a screenshot from a slide.  They also have the same skull with dorsal, ventral, and rostral views.  I refer to this a lot.


Of course, every skull has some amount of variation.  And I'm not even sure of the breed of the dog scanned.  However, it is a long snout breed, at least.  Those seem to be more common on the internet as well.  I have the feeling that the dog I have is an older example, as sutures tend to become less distinct as individuals age.

I have succeeded in pulling out the mandible, mandibular teeth, nasal bone, incisive bone, zygomatic bone, maxillary teeth and most of the maxillary bone so far. Truthfully, I've been having a hard time even getting a comprehensive list of all of the bones that make up the skull.  It's somewhere between 22 and 50...  Ah, google.

So, I have done three things to rectify my lack of knowledge.  First, a library!  I found a library on Stanford campus that has numerous canine vet books that I should be able to check out.  Second, Amazon! I also found a fairly inexpensive book (creatively called Dog Anatomy, by Peter Goody) on amazon that I decided to buy... I must admit that I turned to Amazon before the library, so technically these are in the wrong order.  However, the prices on Amazon made me sit back and realize that there are much better ways I would like to spend my money, bibliophile tendencies aside.  Which leads me to my third choice, eBay!  Yes, I am now the proud owner of a dog skeleton.  This makes me happier than I probably should be.

My text reference should arrive on Tuesday.  And in the mean time, I've been segmenting. 

Putting the roots on the mandibular teeth.
The newly added mandible and mandibular teeth.
Trying to figure out the nasal and incisive bones.  I can't tell you how tricky those were.

Adding the maxillary bone.  My skull is starting to look colorful!

This is often how I work - multiple views, with the 3D preview to the side.  Because I am having such a difficult time spotting the suture lines, I am relying upon a combination of CT and 3D to figure out where different bones are.  This is why I feel an actual skull is so necessary, at least for me.  Then I will be able to trace the sutures on the physical specimen.

I'm off to the library tomorrow, to further my knowledge of canine anatomy.  I do feel a bit nervous, having started this process without hearing from the actual official people... And truthfully I got a little segmentation happy.  I meant to write my proposal this weekend, not segment canine skulls.  So, realistically I should take a step back and figure that out.  Ick.