3/6/09

Red Stick Animation Festival


Well, I never thought I would open up an email from highend3D to see my old home town gracing the pages of their newsletter. However, that day has come! It's kinda cool.

In any case, the Red Stick International Animation Festival has been going on in Baton Rouge since I was a.... something or other in undergrad. Anyway, it was first started in 2005 as a little smallish thing that I thought looked kinda neat. It was hosted on campus then, but it was quite fun.

"The [Festival] is an exciting community event that converges the worlds of technology, art, entertainment, and exploration."


Now, the Festival has gone on to bigger and better things, make no mistake. Events are being held at the Shaw Center for the Arts, the Manship Theatre, LSU Museum of Art, the Old State Capitol, and The Art and Science Museum Planetarium. Much grander than the Union theatre that I remember. The Shaw Center is a beautiful building in downtown Baton Rouge.

The international aspect is very cool, and winners of the Festival come from all countries. And larger companies also scout out the competition. Such as the American Animation Market, and a "Pitch! Contest" that allows animators to showcase their work from start to finish to show to industry professionals.

It's a great event, and I'm proud of my hometown for sponsering it. Which is a strange feeling, let me tell you...

3/4/09

Hand Rig


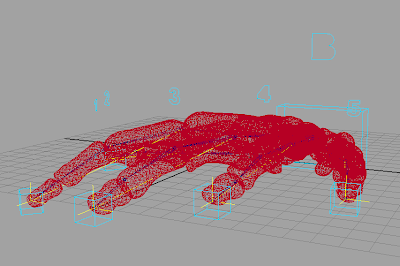
Well, this is my detailed hand rig v 1.5 (I felt it deserved a higher than just 1 seeing as I've reworked it about seven times just this night). Eventually the bones will have a spider-like motion. The geometry is bound with a rigid system, as they are bones and need to move independent of one another. I have not yet gotten a chance to retopologize these bones yet, so they are a tad heavy on the polygon count considering their size.


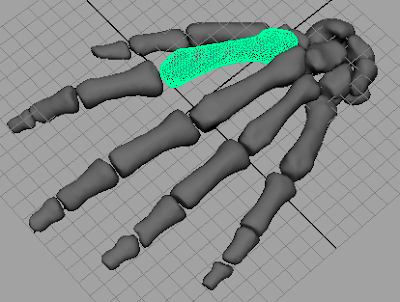
The smallest bone (the distal phalange of the 5th digit) has 340 faces. The densest bone (the metacarpal of the 2nd digit) has 2,636 faces. There are a total of about 30,000 polygons in this model. Needless to say... this is a tad extreme for this model and this could easily be cut in half if not much more than that. I will be considering this as I refine the model.


The reason that they are so polygon heavy is due to the face they are actually exported from a DICOM imaging program. I will be touching on the process I use to go from DICOM data to model at a later date. At this point all that needs to be known is that it gives highly accurate, overly dense model exports. I mentioned the Zbrush retopology feature in an earlier post.


So, as can be seen, the rig itself doesn't have that many bones or IK chains. However, as I was posing it for this post, I noticed some areas (namely the metacarpal joints) that need greater control during IK posing. So, I'll be adding a few more IK solvers soon. The bones just aren't bending quite right with the current set up. It's possible to edit them as I animate, but another set of IK chains will just speed the process up.


In any case, the actual boning is fairly standard, with a joint at each... well... joint. I did not include the midcarpal joint though, seeing as the wrist ends at the carpal bones and no bending is occuring there. But that would have been a non-standard joint in any case. So, there is a root, a wrist joint, and then joints at the carpometacarpal joint, metacarpophalangeal joint, and interphalangeal joints. While the joint between the carpal bones and metacarpal bones doesn't actually experience a great deal of movement, some artificial movement may need to be built in for a more natural walk cycle.


The real complexity begins in the control curves. I of course have the basic control at the end of each digit that constrains the IK handle for that finger. There is also a pole vector on each finger as well, as seen by the number 1-5 (referring to the digit number). There is the body control curve (the B) and an overall wrist control box.


I thought about having curves at each joint to control the orient during FK mode. However, I decided upon set driven keys instead, controlled at the wrist control box. Each joint that would bend during making a fist has its own individual attribute in that curve. In addition, a master IK-FK Blend switch is also there. I tried to make a fist control that I could turn on and off, but I have yet to accomplish that... I think there is a way, but it will involve more linking that I had done so far. I had hoped there was a simpler method.

In any case, the constraints within the curve system were interesting to set up. I wanted the Bend curves (the pole vector controls) to move with the IK handles most of the time, be able to move independently if I needed them to while still staying linked to the IK controls. Also, I needed them to be able to switch to following the Body control curve. So I made an attribute that controled the weight of the constraint as needed.

The body curve moves the wrist joint, not the root. The wrist control box both moves and rotates the entire hand. And of course, it controls the IK-FK blend mode for all five fingers. There is a set driven key on each IK control curve, and then the master set driven key is on the wrist control box.

Now, as I begin to see how this rig animates, I will start planning the walk cycle and other character movements. The hand is going to move across the room and crawl up a table leg, so I will need some pretty fine control over every joint. Hopefully I can add in some standard movements that can be easily triggered. Wish me luck. And if anyone has any hints as how to make this rigging better, I would love to hear them.




3/3/09

Papervision3D


Well, I've spent the last two days having an intense training seminar in Papervision3D (taught by a coding genius, John Lindquist), eight hours a day. It was a great experience, and I think I learned more than I actually know, if that makes any sense. My personal level of action script is not up to snuff, so to speak. I have this great ocean in front of me that is action script... and I'm having a hard time getting to the island that is papervision. Or maybe I just want to go to the beach. Warmth would be nice this time of year.

In any case, I found that the files that he provided were worth the price of admission alone. Well... nearly. Although I was told to use Adobe Director (i.e. Shockwave) when I spoke to the instructor about my heart project, I'm not sure that what I want can't be done in Papervision3D.
(EDIT: later, a few things were discussed and other options within Pv3D were mentioned.)
However, is it necessary? How hard should I push for the Flash component? That is unknown. Unity3D is another highly possible choice for my development. In any case, this class was great in general. I can't wait to get some time to actually output some content.

Object (or trackball) rotation is highly doable, and I think that some masking to show inner anatomy while rotating is also a possibility. I can think of many things that would benefit from being shown from all sides with an interactive component. All of these things are very positive marks in the "why use pv3D" column. There are a few things to be considered, although the flash vs. unity3D could be debated until the end of time.

Flash in general renders everything through code. This cuts down on the graphics card interface, which can be a good thing for a lower end user. However... this cuts down on the graphics card interaction, making high polygon models very difficult to render out. Unity3D talks directly to OpenGL and Direct3D (or something similar), allowing you to use much higher polygonal models. The down side to this is that if you don't have a graphics card that supports it, you can't see the app. There are many more pros and cons, but in general Flash was not originally designed for 3D. That being said, it is a great way to introduce interactivity with a high level of penetration into the market. And the whole "not originally" blah blah is not nearly as relevant as it used to be.

Man, I think that I still need a couple of days (weeks) to truly process the wonders that are Papervision3D. So I leave you with an awesome little link by one of the masters, Den Ivanov.


3/1/09

Retopology

Retopology... retopologization... however you slice it, it's a difficult word to say. But immensely useful to actually do. For example, most items that have been scanned by a device have an ugly, ugly mesh. Usually very dense, and all triangles.

This is a mesh from a femur that was edited in Mimics. It is from a CT data set, taken from the skeleton that I'm currently modeling. Mimics is a program similar to OsiriX - it can take DICOM data (CT, MRI, etc) and export a file that can be read by a 3D program. This is wonderful for achieving highly accurate models, but not so good for clean meshes.


The .obj file is being viewed in a program called MeshLab. It has the ability to handle high-polygon meshes very well.


The femur that I am working with exported with around 139,000 faces. This actually isn't that bad, comparatively speaking. I've easily come across a 4 million poly export from a DICOM program. Even so, this mesh would be a pain to texture and animate with.

This is Zbrush. My main love for Zbrush (and it's a recent discovery) is the retopology tool.


By drawing new polygons on the surface of your high res model, you can export a low res stand-in. The model that I generated has 3,200 polygons. A far cry from 139,000.


I could have made it with fewer polygons, but I found that the mesh reacted best to a slightly denser layout. Perhaps because I'm new to this whole retopology endeavor and haven't learned all the tricks yet. I do have an entire skeleton to work on, so hopefully I'll continue to learn.

The wire frame is now as clean as you make it, allowing for potentially great edgeflow. This makes texturing and animating much, much simpler.


However, this is not what I find the most useful attribute of retopologization. Zbrush allows you to project your original high res mesh back onto the low res model. By matching how many times you up the density during retopologization, subdiving the low res obj that many times again, and then importing the high res mesh on top of this highest division, it becomes a smooth stepping process between the lowest and highest resolutions.


Did that sound complicated? It was very fun for me to figure out, let me tell you. If it didn't... well, you are smarter than I am. Kudos.


In any case, there are tutorials out there on the retopology tool. If you are interested in my entire workflow from Mimics/OsiriX to Zbrush, let me know.


These images that you see are screen shots of the femur as exported from Mimics. I have not done any further editing to it yet. I plan to do so, of course. I will post more images as my bones are completed.