Showing posts with label Maya. Show all posts

9/14/12

Watch those model names...

This is NOT what you want to see when you start working in Unity 3D on Friday, with a meeting scheduled later on.  My scene view looked like this:

Broken textures...

We've been implementing a new naming structure for all of our files, and at some point I broke Unity.  At least you'll never be wondering if everything is connected properly.

Truthfully, most days I long for a programmer. While I can get myself in trouble with coding, I usually don't have much luck in starting from scratch.  And there are things that I do routinely in Unity that I know could be made into scripts.  One day....

Much better.
With a little elbow grease, I got it looking as it should again.  I can't wait to have some time to add Ambient Occlusion into the diffuse maps for these models.  Maybe do a little light mapping....

9/12/12

iBooks and 3D models...

I have come to the conclusion that the iBook authoring tool (and iBooks in general) are just not logical.  I'm trying to accept that, so I can move on and not suffer the same aggravation level that I do now.

I put out a notice, a plea for help really, on a couple of the forums that I follow that deal with new technologies and 3D models.
"So, this might be a long shot... but I'm hoping that some of you may have been working/experimenting in other delivery methods for 3D models. "

However, this is not really an issue that I think has come up for many people in the iBook arena. (At least not the ones I know.) And conversely, those that are used to working with real time 3D models are not really working with iBooks.  It's a subject that I can't address at work for the time being, but it's still very much so on my mind.

Screenshot of the DAE file from the iBook

So, we at Stanford have the "problem" that we are media rich for the anatomy section.  Large images, renders, movies and 3D models.  Now, it's that last one that is really giving me fits.  2 reasons:
  1. Because we are hoping to get this book to run on all three versions of the iPad, the 3D models have to be pretty low res to fit.  Luckily, they were designed with real time in mind, so it wasn't that big of a leap.  But, they are still causing the iPad1 to crash.  At least... I'm 80% sure it's the models.  Everything works, as long as the user is patient.  But what user is actually patient with anything?  Otherwise, the book crashes, and not always with a series of replicable actions.
  2. Animations are supposedly able to be included in the DAE format.  I can't seem to get this to work... anyone know if animations driven by a rig are needed, or if it's only key framed animations?  I'm using the OPENCollada plugin to export the model, which supposedly supports animations...
    EDIT: I gave up on animations.  I would be happy with just a consistent working 3D model.

In any case, I've taken the models down so that they are at least between 30K-60K, if not lower.  (this is for the entire hand - as seen in the screen shot above.)  But I think it's the number of materials associated with the model that might be killing the iPad1, even if the DAE file isn't huge (ranging from 5 to 16mb... and it's actually the larger one that performs better).  Unsurprisingly, transparency and normals maps don't work in the DAE format, so it's only the muscles that have individual striation textures.  I have on run some test variations with completely unreliable results thus far.

While both models 'white out,' only the one of the left does so consistently.  Despite being the same number of polygons and same number of objects.  The only difference is about 5 more materials in the model on the left, which lends credence to the material level theory.

So, when I was testing, I ran into an interesting issue.  There is a threshold where a model causes the iBook to crash every time that page is brought up, a point where the model just 'whites out' and disappears, and finally the point where a model shows up just fine.
I set up this test in a 'test' iBook - which may be part of the problem, but I wanted to remove that as a variable for now.  From the various testing I have done, it seems that the overall load on the book has an impact on whether the 3D models will work as well.  When I went to some 2K graphics for some of the interactives, the model performance decreased significantly. ):  In any case, my testing models -
  1. A 35k model with textured materials
  2. A 56k model with textured materials
  3. A 35k model with procedural materals
  4. A 56k model with procedural materials
  5. A 12k sphere with basic lambert
  6. A 50k sphere with basic lambert
Overall, I have a feeling that it's not the count - I have models that I was testing (for limits) at 165K that show up just fine on the iPad1. In the actual book, even.  No issues, doesn't crash, etc.  But it only has some basic procedural color maps on it.  Which is why I started thinking it wasn't the size of the model, but the number of textures.  I included the sphere because I also started wondering if it was the number of models within the 3D DAE file as well.

However... all of the models in the above testing scenario worked.  The only one that 'whited out' occasionally was actually number 4... which makes no sense to me.  What so ever.  I would have thought it was going to be number 2, if any of them.

I put each of the models on their own page in the test book, but the model that constantly whites out in the actual book is right next to another model that works all of the time (also, making no sense, as it is the same model with slightly different textures, but the same number).
I decided to reduce all of the models in the actual book anyway.  Previewing the book with the reduced models in it didn't have an affect on the usability.  If anything, it went down.  So strike that.  The client doesn't want to really change the look of the models, so I am trying to not loose all of the textures on the hand.  I may need to go to a single model with a texture atlas instead of individual models though...
What aggravates me the most about all this is the lack of consistency.  If a model crashes the book, it should be that model that needs to be addressed.  But, there is not a series of replicable actions that I can get to crash the book.  Heck, I can't even get the same model to not work every time.  This is the source of my frustration.  If I knew which models needed looking at, I could fix them.  Otherwise, I'm shooting into the dark and hoping to hit a bulls-eye.

9/5/12

Ambient Occlusion

Ambient Occlusion - the idea behind AO for me has always been "well, if I can include that in my renders, I will really be the cream of the crop."  However... I never have really looked into it in a hard core kinda way.  Go figure.

So, embolded by my foray into SEM textures, I did a little looking.  And by a little, I mean about 20 minutes worth.  So, really little.  I am working on this crazy iBook thing...  In any case.  AO is nifty.


Obviously, this isn't anything special.  My hand model, with just a few thumb tendons and some ligaments.  But... I love the way AO looks.  My fellow medical artist, Leslie White, has done some really nifty AO renders of the head and neck that I just adore.  They look fantastic.  I'll post some of those soon.

So, I have my settings saved now. An AO texture that I can apply and render out for all of my models, bake it on, etc. I really wanted to be able to show you a non-AO model vs. one with AO... but that's not happening today.  I have had much too much to do to tweak anything anymore.  So, here's a comparison between final gather & global illumination vs. none.

The Goldilocks senario of FG & GI:
No FG & GI

Too much FG & GI


Much closer to 'just right.'


I'm still tweaking the settings, but it's getting to a much better point that it was just a few hours ago.  And if I can bake that type of light map onto the model, I can export it out into Unity and iBooks, etc, and make the models look 4000x better.  In the mean time, I have a ... few renders that look a little less like crap in the iBook now.


9/2/12

Maya SEM texture

So, I've been busy working away at lots of really, really cool things... that I can't talk about.  I'll do another post on Amira soon.

In the mean time, one of the things that I was playing around with on my own time.  Nothing ground breaking, but I like the look of it.  A WIP SEM type texture for Maya.  It's not quite as hard as I would have feared, thank goodness, although not as easy as I remember Max being.

Shading network

This is the shading network that I worked out, with some google-fu and intuition.  I have two SampleInfo nodes connected to the V-coordinates and U-coordinates of a RampTexture that has a black to white ramp.  This is then fed into the transparency setting of a lambert shader.  I have another SampleInfo, connected similarly to another RampTexture.  This one has the color that I want reflected in my model (just a test here) as part of the ramp - as you might expect, this is fed into the color connection of the lambert.

To round it all off, and give a hint of style, I have a brownian bump map on the texture.

I also deleted all the lights in the scene, and amped the Ambient setting to the max, as SEM and Xrays don't have light sources...


This is what it looks like in the scene window... :(

But this is what it looks like once rendered!  Fun.


Started playing with the settings a bit more - adding in some iridescence to give a flatter look, etc.  Having fun!


So, nothing super spectacular, but at least I have the beginnings of how to simulate a neat looking render in Maya.  I'm going to save this Shader, and try out a few more permutations... and maybe see how it looks in Unity as well!


7/11/12

Types of Hand Rigs

So, it seems that I am destined to be rigging hands for years to come.  It's been quite a while since first rigged my hand for the spider crawl, which actually turned out pretty fun.

That was one of the first tests I did using that IK/FK rig for the hand.  A simple walk cycle - I can see now how certain fingers slide inappropriately and there could be a lot of refinement.  And I beg your indulgence in this video - a short clip of the hand from the animatic I made for a school project, back in the day.  But a good example of the animation I was doing then.


I'm not even going to go into what I would change - but I would love to revisit this animation.  And I may do so eventually.  It was a fun concept.

However, this is one example of what kind of animations can be produced with a semi-decent IK rig.  A more generalized type of motion, very fluid, not very precise, but more 'movie-like.'

I consider this to be a 4 (on a scale of 1 to 5) for complexity.  I didn't include a way to manipulate individual carpal bones, like you can do with this type of rig.

Hand rig with carpal bone manipulation

Most rigs don't need carpal bone changes, as they actually change very, very little.  I also realized that most rigs aren't using actual bones either, but pretty much all of mine do.  A 'hazard' of being a medical illustrator.

I have done some animations that actually show the changes in carpal bones during tensing and relaxing of specific motions.  However, those were all FK only rigs, as I needed to very specifically place and animate all of the bones (based upon fluoroscopic videos and segmented bones from CT scans from the tensed and relaxed positions).  This was another early rig, and I can think of better ways to do it now, but it served it's purpose at the time.

I just finished another rig, one for an arm, including the hand.  We are testing out a new, innovative type of motion capture (that I can't actually say much about now...) and we needed a basic rig for said testing.


So, I have a FK rig for the shoulder, elbow, wrist, and fingers here.  I used to bind anatomical bones to rigs using the rigid bind method, as they are rigid bodies, but that actually really limits you on later editing.  So, I now bind using the smooth bind, but I limit the influences to 1 and bind to selected joints only.  This helps me during the process of editing the rig as necessary (and makes for very pretty colors).


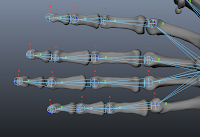
The hand itself is a fairly simple rig as well.  The thumb has a metacarpal joint, but the fingers do not.  The finger metacarpals are pretty stationary (with some exceptions, but not an appreciable amount for this type of rig).  The fingers and thumb can bend at every joint, and the wrist also has basic movement as well.


I'm not entirely happy with the way the wrist moves, as there is sliding motions involved in true wrist movement, and my rig just has the rotation involved now.  I'm thinking there might be some MEL scripting that I can incorporate to automatically slide the joint as it rotates, but I haven't worked it out yet.  I'm letting it percolate in the back of my head right now.

As you can see here, the joints were improperly rotated at first.  This caused the fingers to deviate improperly when formed into a basic fist (as well as other movements).

I generally use the finger curl/fist movement to initially test a rig as it shows big problems right away without a lot of testing needed.


I popped back into the component editing and straightened out my joints further.


And now you can see that the fist is correct.  This is the extent of this rig, as it is only being used to test another system.


I've certainly learned a great deal since that initial hand animation.  I use hand rigs quite often at Stanford, mostly just to position different types of anatomy, especially the bony structures.  I don't use the IK-FK method often, as I usually need to position bones quick and dirty like.

My next greatest challenge (probably a 12 on the scale) is to make a rig that can handle all of the soft tissue elements (muscles, ligaments, arteries, and nerves) as well as the bones.  That's... going to take some thinking.


7/10/12

Rodin Gallery

So, I think I spent more time trying to figure out an image gallery for this blogger blog than I did at the museum.  Not literally, but it sure feels that way.  And we'll see how this works.  Please, let me know how this style of image gallery works for you, and if you prefer this gallery style. Or if you would rather the larger, expandable version of the images, I would love to know that too.

I had a great time at museum, and these are a few of the follow-up images I tried to take of the Rodin hands.  


And for your viewing pleasure, a few of the other images from the day.

7/6/12

Rodin Hands, part 2

I went down to the Gates of Hell today.  However, the weather was actually fairly pleasant.


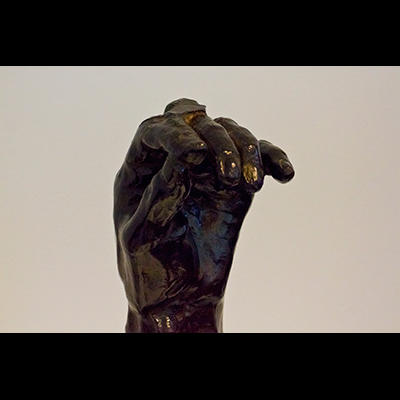
I was able to take some helpful photos of the hands in their natural museum environment.  I also learned a valuable lesson - always check your equipment before shooting.  I was shooting in JPG mode, not Camera Raw, unfortunately.  It actually is not a huge deal, as these are just reference images.... but it still bothers me.  Live and learn, I suppose.

So, these are the best quality, but I sure had fun taking them.  I will probably wander back through the Cantor Arts Museum- it's both free and awesome.  Not a combo you see very often!

In the mean time, a smattering of some of the many, many images I took today.

Rodin, 1885-1886: Left Hand of Pierre and Jacques de Wiessant


Rodin, 1888: Large Clenched Left Hand

Rodin, 1903: Large Left Hand - detail

Rodin: Small Clenched Right Hand - detail

Rodin: (behind) Small Clenched Right Hand, (foreground) Clenched Left Hand, 1900

Rodin, 1880-1884: Blessing Left Hand

Rodin, 1886: Left Hand of Eustache de St. Pierre - detail


Rodin: (foreground) Blessing Left Hand, 1880-1884, (behind) Large Left Hand, 1903